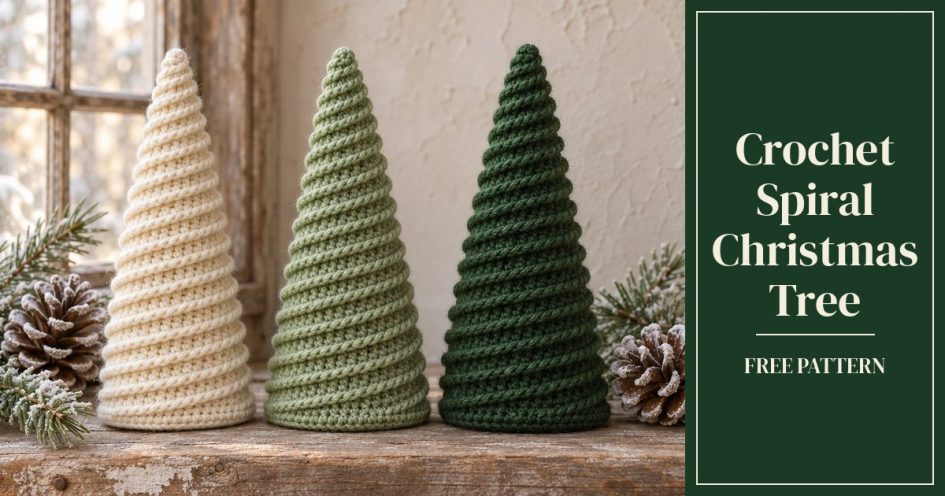
This crochet spiral Christmas tree has no sewn-on parts. The ridge that winds around it grows out of the cone itself, one unbroken line of half double crochet from the rim to the tip. Under it sits the plainest crochet Christmas tree you can make, a stuffed cone. Make one in cream, or a small stand of them in different greens for a mantel or a shelf.
- Size: about 7 in (18 cm) tall and 3 in (8 cm) across the base, calculated from the gauge below
- Yarn: worsted weight (#4), about 90 yd (80 m)
- Hook: 3.75 mm (US F/5)
- Skill: adventurous beginner
- Stitches: magic ring, single crochet, increase, decrease, back loop only, half double crochet, slip stitch
- Time: roughly 3 to 4 hours, going by the stitch count
How to crochet a spiral on a Christmas tree
Every stitch has two top loops. Work a round into the back loops only, and the front loops stay behind on the surface. Amigurumi rounds run in one continuous coil, so those spare loops form a single track from the rim of the cone up to its tip.
Once the cone is stuffed, you go back to the bottom and crochet along that track. Half double crochet is tall enough to stand away from the cone, and that height turns a faint line into a ledge.
What you need
- Worsted weight yarn, about 90 yd (80 m) for one tree
- 3.75 mm (US F/5) crochet hook
- Polyester fiberfill
- Stitch marker
- Tapestry needle and scissors
- Optional: a small bag of poly pellets to weigh down the base
Pick a firm yarn with clear stitch definition, such as a plain acrylic or a wool blend. Chenille and loosely spun yarns swallow the ridge.
Gauge
Aim for 20 sc and 16 rounds to a 4-inch (10 cm) square, worked in back loops. Tight fabric matters more than exact numbers on a tree. If fiberfill shows between the stitches, go down a hook size. After Rnd 8 the base should lie flat and measure about 3 inches (8 cm) across.
Abbreviations (US terms)
MR magic ring, sc single crochet, hdc half double crochet, inc 2 sc in one stitch, dec sc two stitches together, BLO back loop only, ch chain, sl st slip stitch, st stitch, Rnd round
Crochet spiral Christmas tree pattern
Work in a continuous spiral without joining, and move a stitch marker up at the start of each round. The number in brackets is the stitch count at the end of the round.
Base
Use both loops as usual. The increases shift position from round to round, which keeps the circle round instead of six-sided.
| Rnd 1 | 6 sc in a magic ring | [6] |
| Rnd 2 | inc × 6 | [12] |
| Rnd 3 | (sc, inc) × 6 | [18] |
| Rnd 4 | (sc, inc, sc) × 6 | [24] |
| Rnd 5 | (3 sc, inc) × 6 | [30] |
| Rnd 6 | (2 sc, inc, 2 sc) × 6 | [36] |
| Rnd 7 | (5 sc, inc) × 6 | [42] |
| Rnd 8 | (3 sc, inc, 3 sc) × 6 | [48] |
Cone
From here on, every stitch goes into the back loop only, decreases included. Rnd 9 will fold the edge up and start the cone. For a decrease, slide the hook under the back loops of the next two stitches, yarn over, pull up a loop through both, then yarn over and pull through the 2 loops on the hook.
| Rnds 9–11 | sc in each st | [48] |
| Rnd 12 | (6 sc, dec) × 6 | [42] |
| Rnds 13–15 | sc in each st | [42] |
| Rnd 16 | (3 sc, dec, 2 sc) × 6 | [36] |
| Rnds 17–19 | sc in each st | [36] |
| Rnd 20 | (4 sc, dec) × 6 | [30] |
| Rnds 21–23 | sc in each st | [30] |
| Rnd 24 | (2 sc, dec, sc) × 6 | [24] |
| Rnds 25–27 | sc in each st | [24] |
| Rnd 28 | (2 sc, dec) × 6 | [18] |
| Rnds 29–31 | sc in each st | [18] |
| Rnd 32 | (dec, sc) × 6 | [12] |
| Rnds 33–34 | sc in each st | [12] |
| Rnd 35 | dec × 6 | [6] |
| Rnd 36 | sc in each st | [6] |
Start stuffing around Rnd 24. Press fiberfill firmly into the wide end first, with the pellets at the very bottom if you use them, then top it up every few rounds. Before Rnd 35, pack the narrow tip with the end of your hook.
After Rnd 36, fasten off with a long tail. Thread the tail through the top loops of the last 6 stitches, pull the hole shut and bury the end inside the tree.
Spiral ridge
Hold the tree upright. Find the row of spare front loops left by Rnd 8, right where the base turns into the cone.
Join your yarn with a sl st in the first of those loops, ch 1, and work 1 hdc in the same loop. Then work 1 hdc in every spare front loop as the track carries you around and up the tree. The full track is 834 hdc, and there is no need to count them.
Above a decrease the loops sit closer together. Take them all, because skipping any leaves a gap in the ridge. The track ends just under the tip. Sl st in the last loop, fasten off and pull the tail inside.
Finishing
Press the base against a table to flatten it, then roll the tree between your palms to spread the stuffing. Run a finger under the ridge and nudge it downward all the way up, so it reads as layers of branches.
Colors and sizes
- Two colors. Join a second color for the ridge. A cream ridge on a dark green cone looks like snow caught on the branches.
- Smaller tree. Stop the base after Rnd 6 (36 stitches), then skip ahead to Rnd 17 and carry on from there. The tree comes out about 5 in (13 cm) tall and 2 1/4 in (6 cm) across.
- Taller tree. Add one straight round to each band, from 48 stitches down to 12. Those seven rounds add about 1 3/4 in (4.5 cm).
- Other yarns. Bulky yarn with a 5.5 mm hook should give roughly 10 in (25 cm). Sport yarn with a 2.75 mm hook should give about 5 in (13 cm). Both are estimates, so check your gauge first.
If something looks off
- The base bulges. Too much stuffing is pressing on it. Pull a little out, or slip a circle of stiff plastic canvas inside before you stuff.
- The cone looks six-sided. Corners come from decreases stacked on top of each other. Check that yours shift position the way the rounds above do, and ease off the stuffing if the corners still show.
- The ridge flops. Soft yarn or loose stitches are the usual cause. Rework it with a hook one size down, using the same yarn.
Mark your place on the track with the stitch marker whenever you put the tree down. Spare loops are easy to lose in dark yarn, and the ridge only looks right if it never jumps a row.