If you’ve ever wondered what to do with wine corks once the jar is full, December has a good answer. Cork cuts with a kitchen knife, takes hot glue and paint, and holds a screw eye, so most of these wine cork projects need nothing more than a glue gun and an evening at the table.
Below are ten wine cork crafts for Christmas: three ornaments for the tree, two little figures for a shelf, two trees, and three pieces for the table and the front door. These wine cork craft ideas are DIY cork crafts in the plainest sense, made from what’s in the jar plus a few things from a craft drawer. Each one comes with a list of what you need and the steps.
Before You Start: Getting the Corks Ready
For almost all of these wine cork ideas, natural cork is the material you want. You can tell it by the speckled, slightly crumbly surface; synthetic corks are smooth, uniform and made of plastic. Synthetic ones work where a cork stays whole, but they’re slippery under a knife and need a small saw to cut, so keep them for projects that use whole corks. Wine-stained ends are worth keeping, too, since the red tops look lovely on a wreath.
A standard wine cork is about 24 mm across (just under an inch) and 38 to 49 mm long. Sparkling wine corks are wider, and the broad top of one makes a good round head for the gingerbread man and the snowmen below.
To cut corks cleanly, mark the cut lines first, then soften the corks in boiling water for about 10 minutes, or steam them for the same time. Cut them while they’re still warm with a serrated knife, sawing gently rather than pressing straight down; a light film of oil on the blade helps. New corks from a craft store soften less than corks pulled from bottles, so give them a little longer. Let cut pieces dry overnight before you glue or paint them.
A hot glue gun handles nearly every joint here. Hold each piece in place for a slow count of ten while the glue sets. If a project uses a polystyrene foam form, switch to a low-temperature glue gun, because a hot one melts the foam. Before twisting in a screw eye, start a hole with an awl or a thick needle so the cork doesn’t split.
DIY Wine Cork Ornaments for the Tree
1. Wine Cork Snowflake Ornament
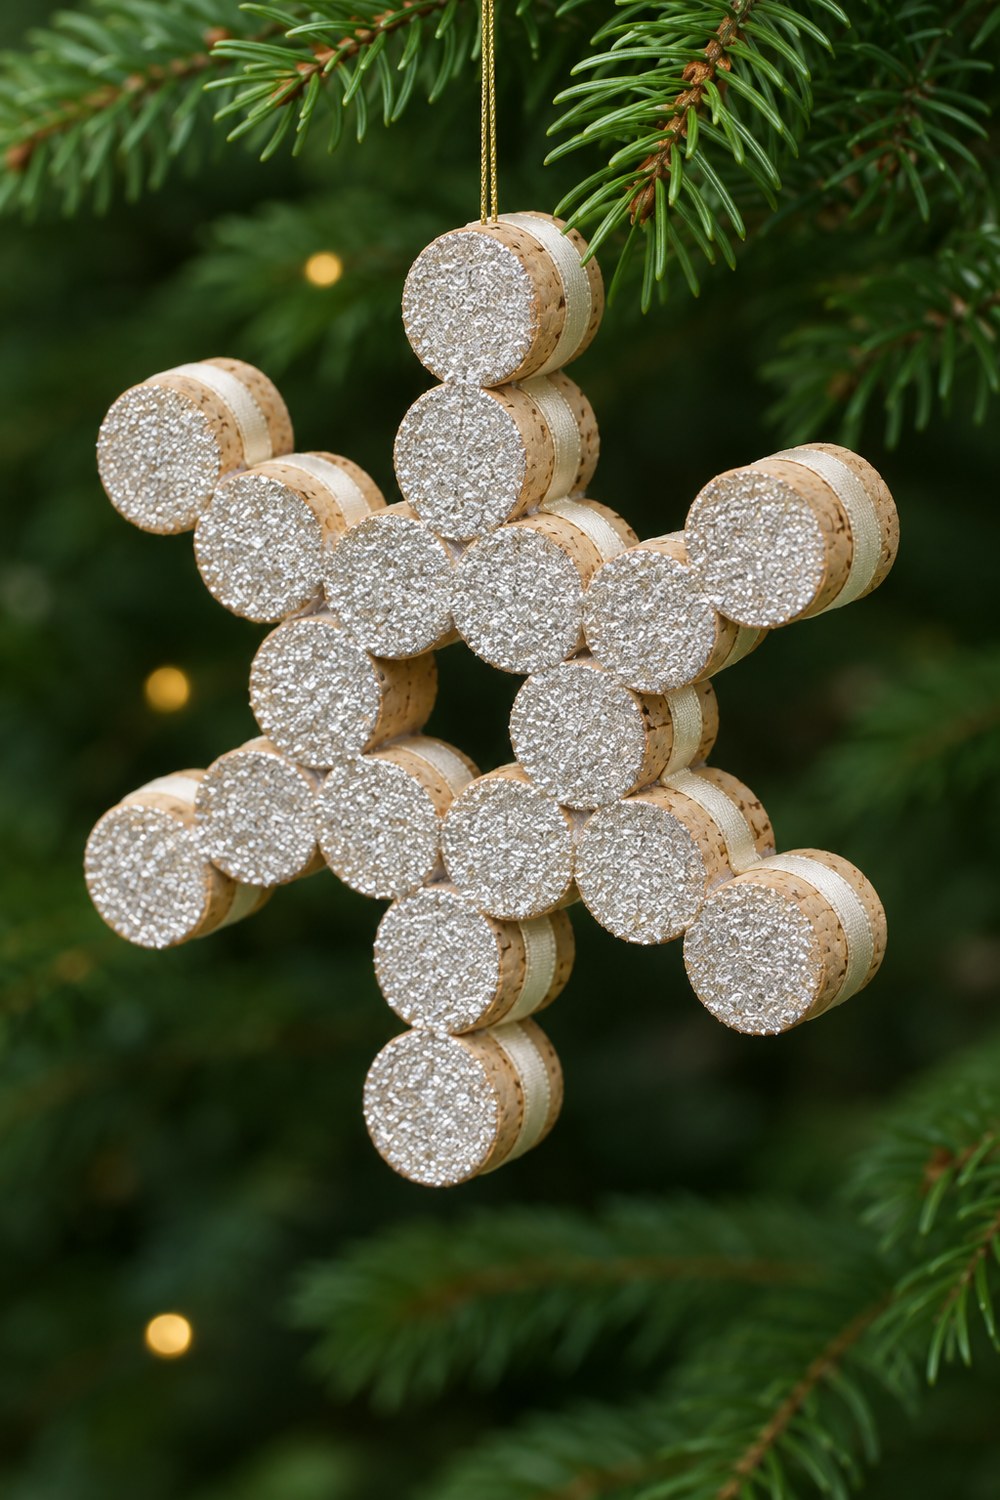
A cut cork has a flat face that holds glitter well, and eighteen glittered rounds are enough for a six-armed snowflake: six in the middle and two on each arm. The ivory ribbon wrapped around each piece hides the bare cork sides and catches the tree lights along with the glitter. It’s the only one of these wine cork Christmas ornaments that needs glitter.
You’ll need: 9 natural corks, a serrated knife, white craft glue and a small brush, chunky silver glitter, narrow ivory satin ribbon, hot glue, a needle and gold thread.
- Soften the corks and cut each one in half across the middle, for 18 rounds.
- Brush craft glue on one flat end of a round and press it into a dish of glitter. Repeat for all 18 and let them dry, then tap off the loose glitter.
- Wrap a strip of ribbon around the side of each round, gluing it all the way round with a thin line of hot glue.
- On a sheet of baking paper, glue six rounds into a small cluster for the center. Add two rounds to each side of the cluster to make the six arms, glitter faces all pointing the same way, and put glue wherever two rounds touch.
- Thread the needle with gold thread, pass it under the ribbon band of the top round, and knot the ends into a hanging loop.
2. Wine Cork Gingerbread Man Ornament
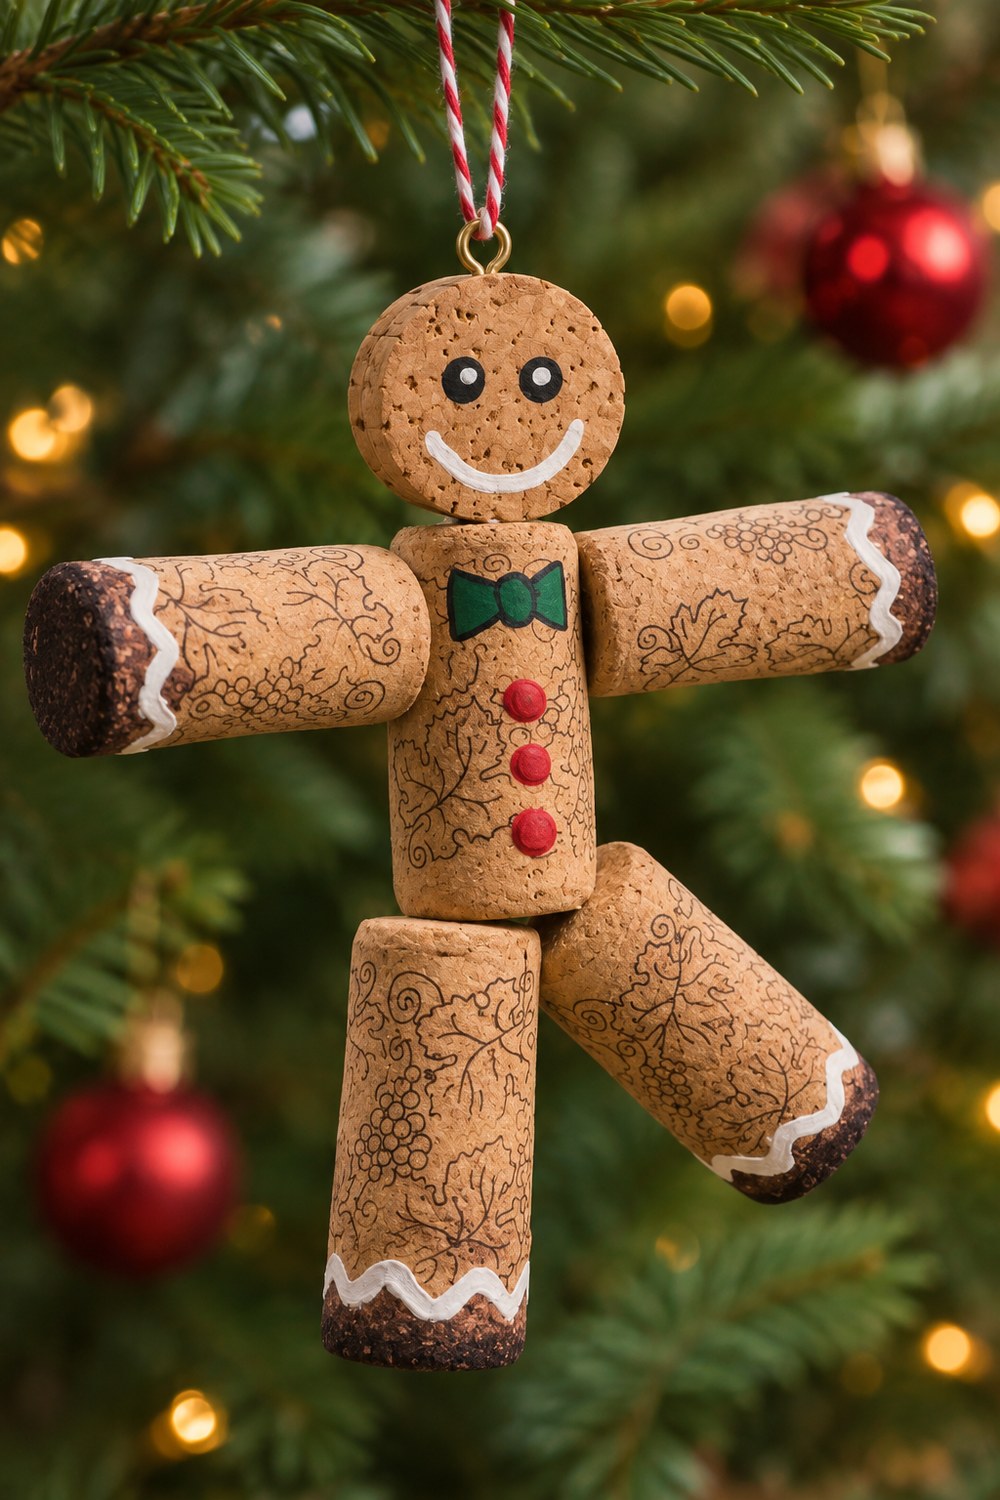
With one leg kicked out to the side, this gingerbread man looks like he’s dancing off the branch. Brown pen doodles of vines, swirls and grape clusters cover every cork, and a white icing line runs around each hand and foot.
You’ll need: 5 natural corks, 1 sparkling wine cork, a serrated knife, dark brown, white, red and green acrylic paint, a fine brown pen, a toothpick, hot glue, a small gold screw eye and red-and-white baker’s twine.
- Cut a slice about ½ inch (1.2 cm) thick from the wide top of the sparkling wine cork for the head.
- Paint one end of four corks dark brown for the hands and feet. When dry, add a wavy white line around each one, just above the brown, like piped icing.
- Draw swirls, vine leaves and small grape clusters over all five corks with the brown pen.
- Stand the fifth cork upright as the body. Glue an arm to each side at the top. Glue one leg under the body, set a little to one side, and the other leg beside it at an angle.
- Push half a toothpick into the top of the body, put a drop of glue around it, and press the head on so it faces forward. Paint two black eyes with a white highlight, a white smile, a green bow tie and three red buttons.
- Twist the screw eye into the top of the head and tie on a loop of baker’s twine.
3. Beaded Cork Drop Ornaments
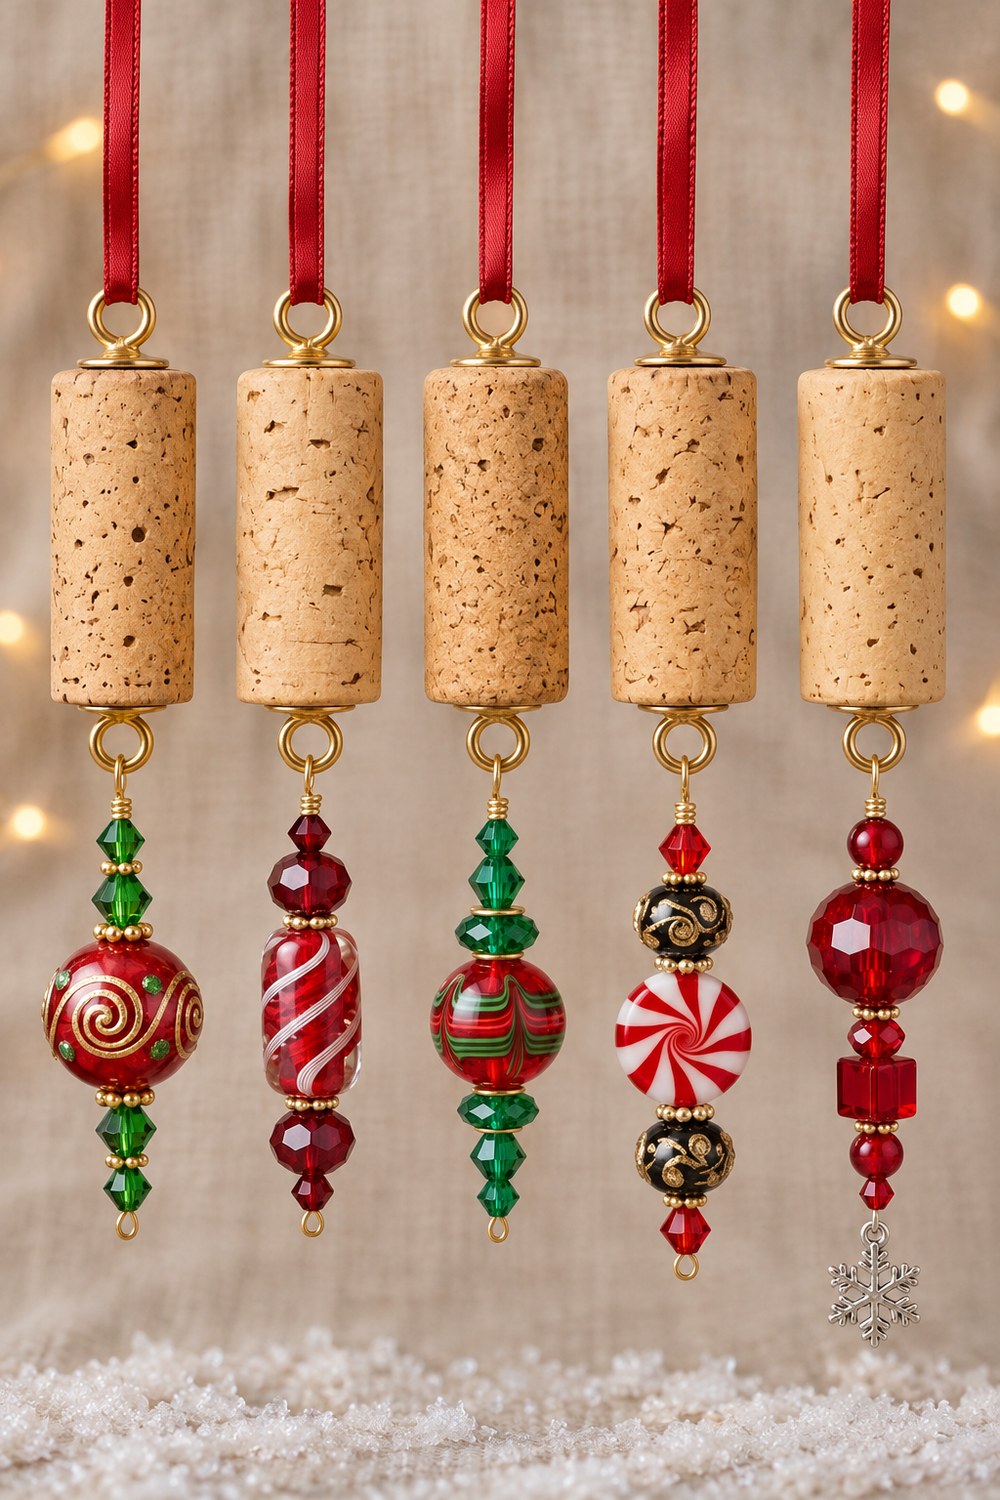
Of all the cork ornaments in this list, the beaded drops are the only ones with no cutting and no painting. Each is a whole cork with a screw eye at both ends and a short string of beads hanging below. Mix the beads differently on every drop, with red and green crystal beads, a striped lampwork bead, a peppermint bead or a tiny snowflake charm at the very end.
You’ll need (for each): 1 natural cork, 2 small gold screw eyes, 2 small gold bead caps, a 3-inch eye pin, 5 to 7 glass beads, a few small spacer beads, a jump ring if you add a charm, round-nose pliers, wire cutters, and 8 inches of narrow red satin ribbon.
- Slip a bead cap onto each screw eye and twist one into the center of each end of the cork.
- If you’re using a charm, hang it on the eye of the eye pin with a jump ring.
- Thread the beads onto the pin, with one large bead as the centerpiece and smaller beads and spacers above and below it.
- Bend the top of the pin into a loop with round-nose pliers, hook it through the bottom screw eye, wrap the leftover wire twice around the base of the loop, and trim the end.
- Thread the ribbon through the top screw eye and knot it into a hanging loop.
Cork Figures for a Shelf or Mantel
4. Cork Reindeer
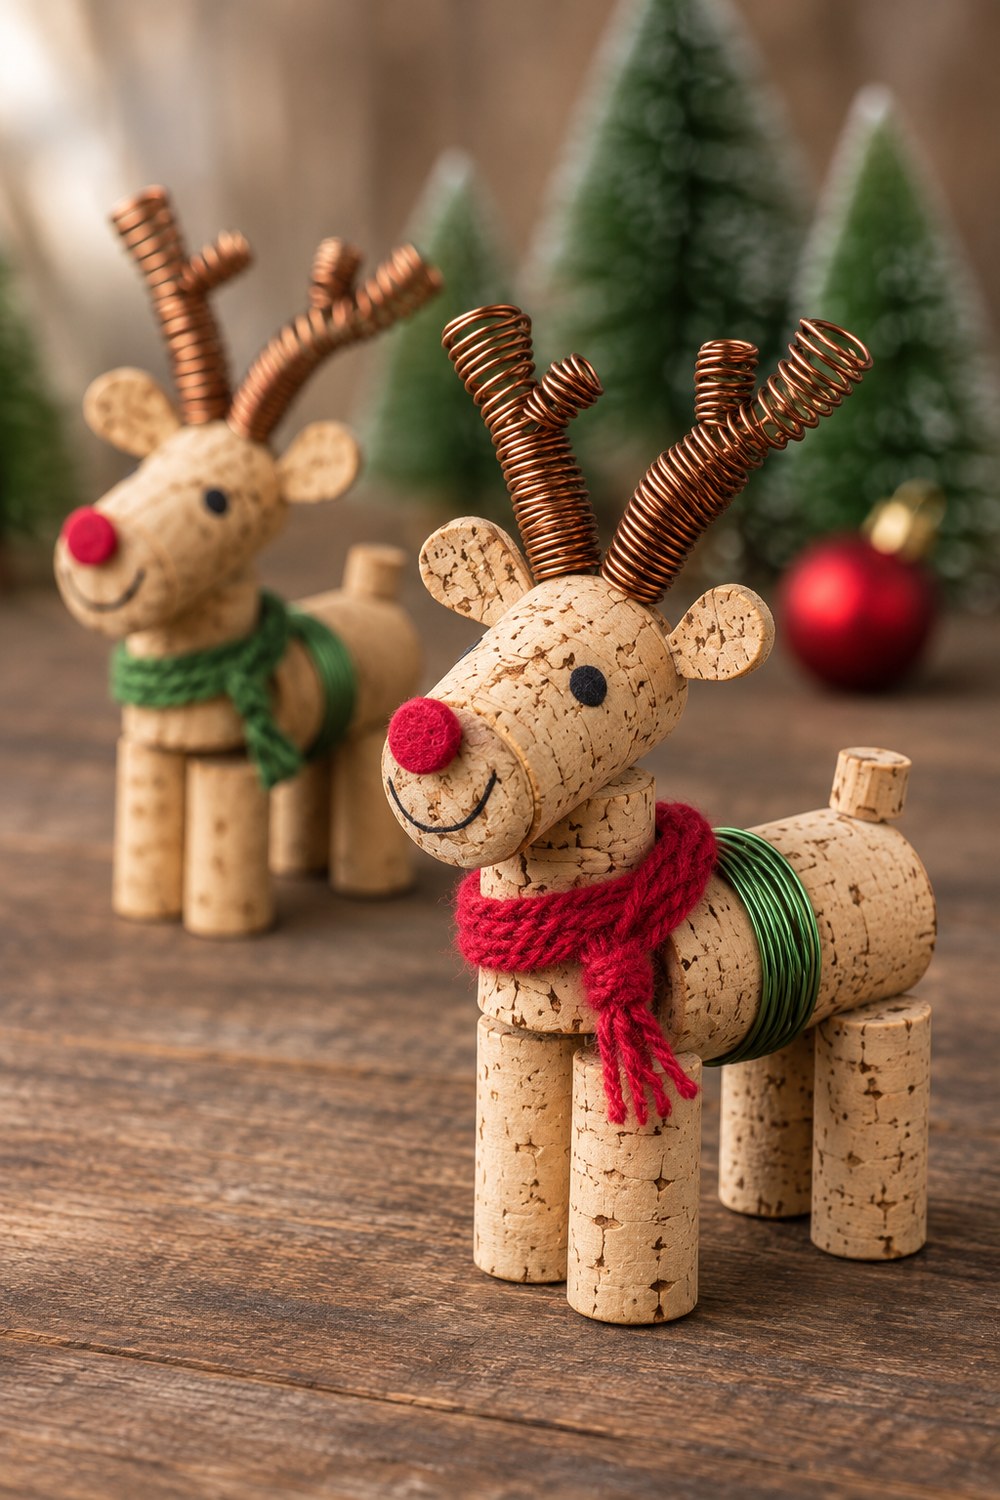
Copper wire wound around a pencil makes springy antlers, and a short prong twisted onto each one keeps them from looking like plain springs. Under the antlers, a wine cork reindeer is seven corks, a red felt nose and a knitted scarf with fringed ends.
You’ll need (for one): 7 natural corks, a serrated knife, about 5 feet (1.5 m) of copper craft wire, a pencil, wire cutters, a small piece of thin green wire, red felt, a scrap of knit fabric or yarn for the scarf, a black marker, an awl and hot glue.
- Glue two corks side by side, standing upright, for the front legs, and two more for the back legs.
- Glue a fifth cork upright on top of the front legs as the neck.
- Lay the sixth cork on its side for the body, resting on the back legs, with its front end glued against the neck.
- Glue the last whole cork across the top of the neck for the head, one end pointing forward like a muzzle.
- From an offcut, cut two thin slices and round them into ovals for the ears, plus a small stub for the tail. Glue the ears to the sides of the head and the tail upright at the back of the body.
- For each antler, leave a 1-inch straight tail and wind the wire around the pencil in open coils for about 2 inches. Make a shorter coil the same way for the prong and twist its tail around the main coil. Poke two holes in the top of the head with the awl, add a drop of glue, and push the straight tails in.
- Glue on a round red felt nose, draw the eyes and a smile, wrap the green wire around the body a few times, and tie the scarf around the neck so the fringed ends hang down.
- To turn it into a cork reindeer ornament, twist a small screw eye into the middle of the back and tie on a ribbon loop.
5. Cork Snowmen
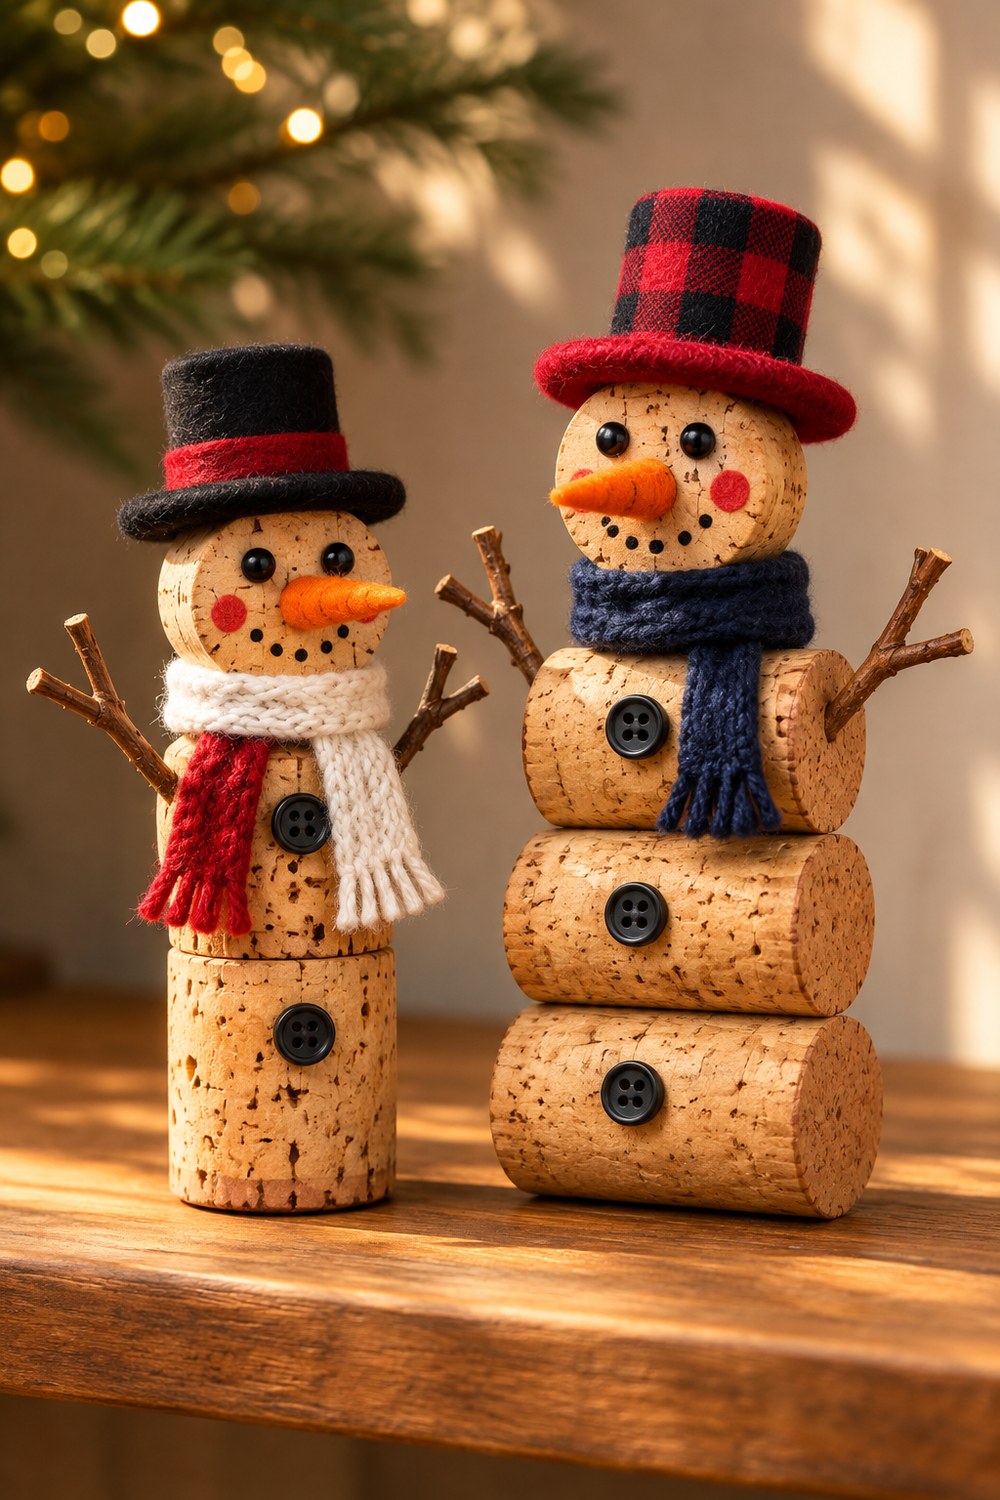
The tall snowman is three corks lying on their sides, stacked like logs; his short friend stands on two short pieces of cork. Both faces are slices from the wide top of a sparkling wine cork, which is why they come out a little wider than the bodies.
You’ll need (for both): 4 natural corks, 2 sparkling wine corks, a serrated knife, black and red felt, red-and-black check felt or fabric, orange felt, scraps of knit fabric or yarn in navy, white and red, small black buttons, small black beads for the eyes, thin twigs, black and pink paint, an awl and hot glue.
- Cut a slice about ½ inch thick from the wide top of each sparkling wine cork for the faces. Cut one natural cork into two pieces about 1 inch long for the short snowman’s body.
- For the tall snowman, lay three corks on their sides and glue them in a stack. For the short one, glue the two short pieces end to end, standing up.
- Glue a face on top of each body, flat side forward. Glue on bead eyes, paint a dotted smile and pink cheeks, and add a nose rolled from a small triangle of orange felt.
- For each hat, roll a strip of felt into a short tube and glue it, glue a felt circle on top to close it, and glue the tube onto a wider felt circle for the brim. Make the tall snowman’s hat from check felt with a red brim, and the short one’s from black felt with a red band. Glue the hats onto the heads.
- Glue on the buttons and poke a hole in each side with the awl for the twig arms. Give each wine cork snowman a scarf: navy for the tall one, white with a red one over it for the short one.
Wine Cork Christmas Trees
6. Painted Cork-End Trees
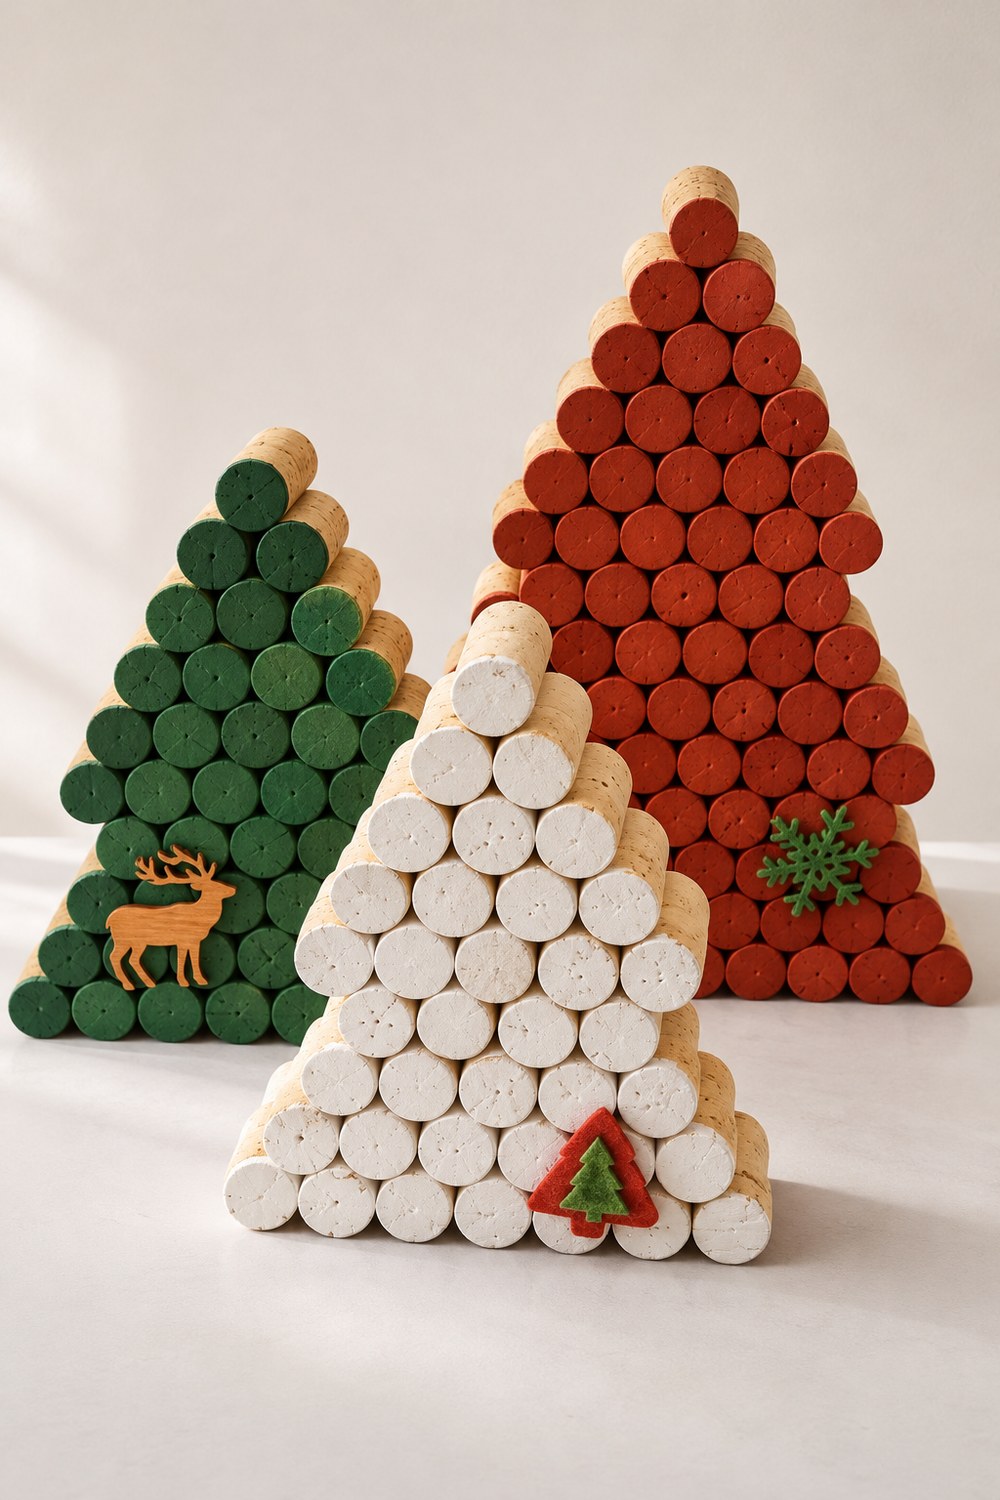
Stack corks on their sides in a triangle, paint the ends that face forward, and you have a small wine cork tree for a shelf or table. Three of them in deep green, rust red and white make a little grove; stand the tallest at the back and give each one a single decoration low on the front.
You’ll need (for one small tree): 28 natural corks, acrylic paint, a small brush, hot glue, and one small decoration such as a wooden reindeer cutout, a felt snowflake or a tiny felt tree.
- Paint one end of every cork and let it dry; a second coat gives the solid color in the picture.
- Glue seven corks side by side on the table, painted ends facing forward, for the bottom row.
- Glue a row of six on top, each cork sitting in the groove between two below. Continue with rows of five, four, three and two, and finish with one cork at the top.
- Glue your decoration to the front, low on the tree.
The trees in the picture are taller. Every cork you add to the bottom row adds one more row to the tree, so a base of nine makes a nine-row tree from 45 corks.
7. Wine Cork Christmas Tree on a Cone
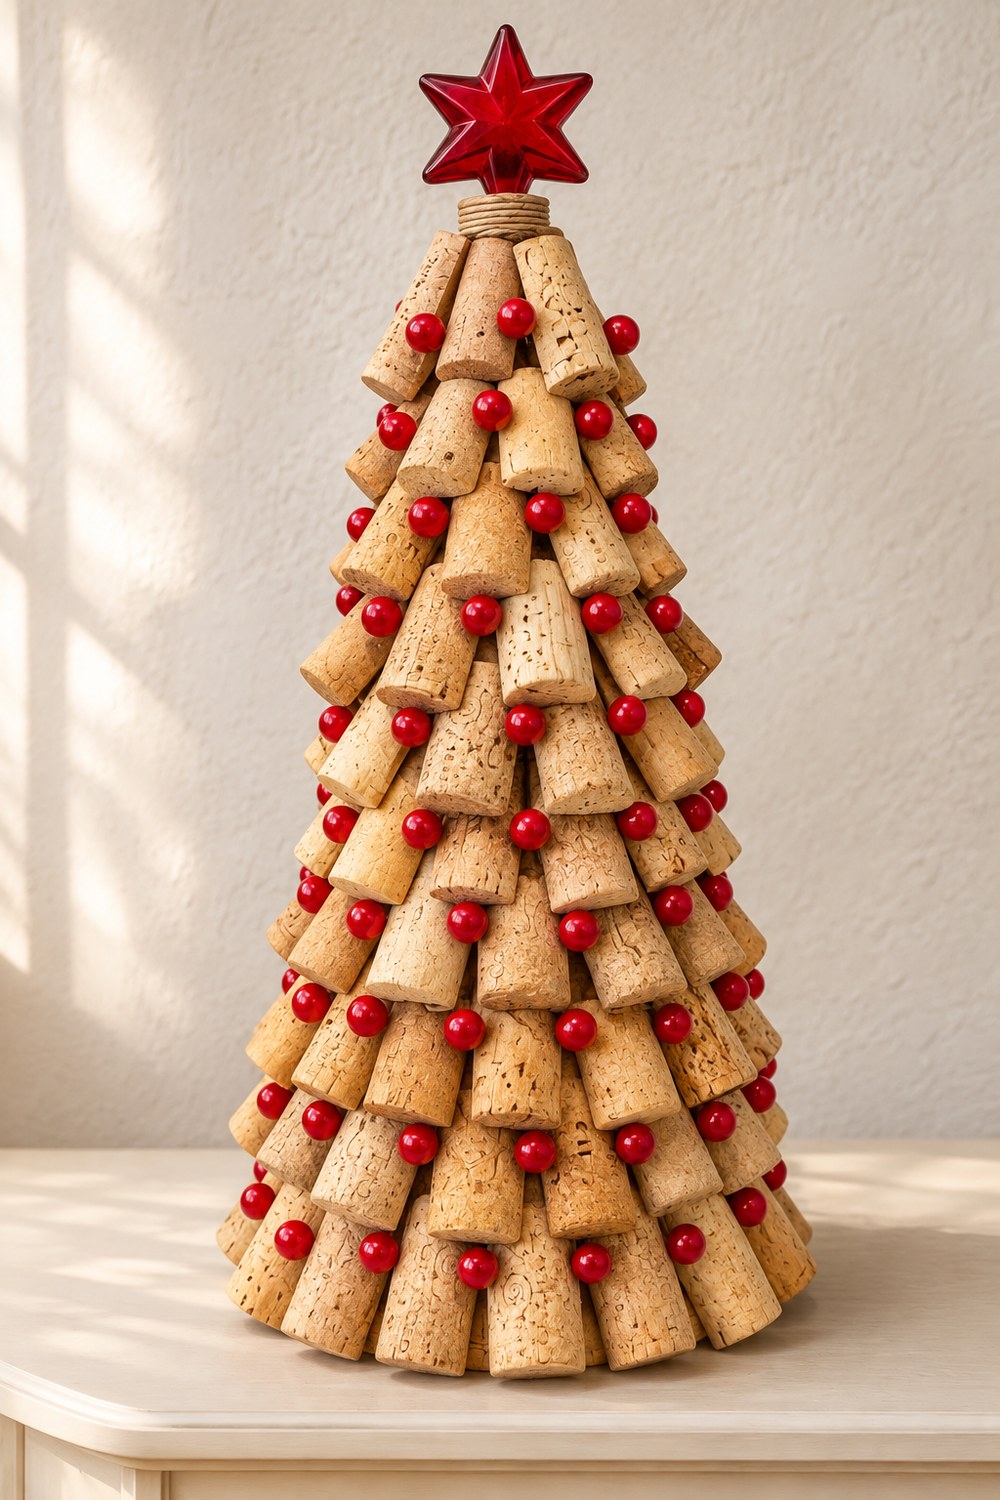
This DIY wine cork Christmas tree is a foam cone covered in corks set at a downward angle, row over row like shingles on a roof. Red berry pins sit between neighboring corks all the way round, and a red glass star finishes the top.
You’ll need: a polystyrene foam cone about 16 inches (40 cm) tall, a large bag of natural corks, a low-temperature glue gun, a box of red round-head pins, a short length of jute twine and a star topper.
- Before gluing, stand corks in a ring around the base of the cone to see how many the bottom row needs; each row above takes a few fewer.
- Glue the bottom row with the corks tilted out and down, their lower ends resting on the table.
- Glue the next row so each cork covers the top of the gap between two corks below. Keep going up to the tip.
- Push a red pin into the cone between each pair of neighboring corks, row by row.
- Wrap the tip in twine and glue the star on top.
Wine Cork Decor for the Table and the Door
8. Wine Cork Candle Holder
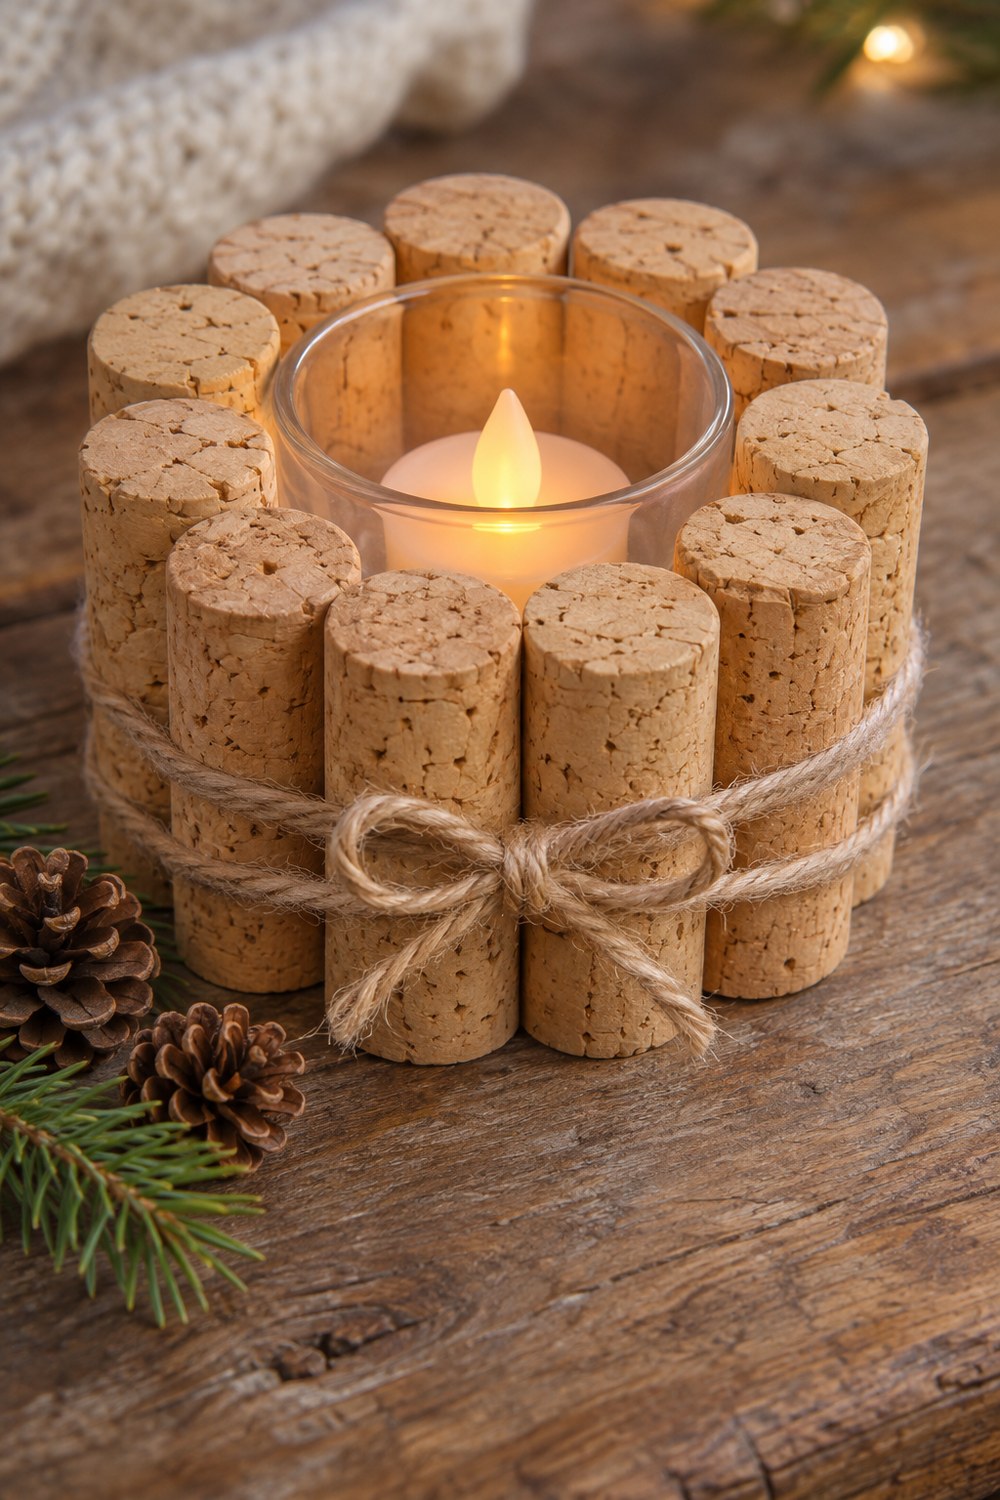
Eleven corks standing in a ring hold a glass votive cup about 2⅓ inches (6 cm) across, and two rounds of jute twine tied in a bow keep them together. Inside goes an LED tealight. The corks and twine sit right against the glass, and a flameless light glows just as warmly.
You’ll need: 11 natural corks, a short glass votive cup, an LED tealight, hot glue and jute twine.
- Stand the corks around the cup to check the fit. For a wider cup, add a twelfth cork.
- Glue the corks to each other side by side, then close the ring around the cup and glue the last joint.
- Wrap the twine around the corks twice and tie it in a bow at the front.
- Set the LED tealight in the cup.
9. Cork Advent Wreath with a Little Village
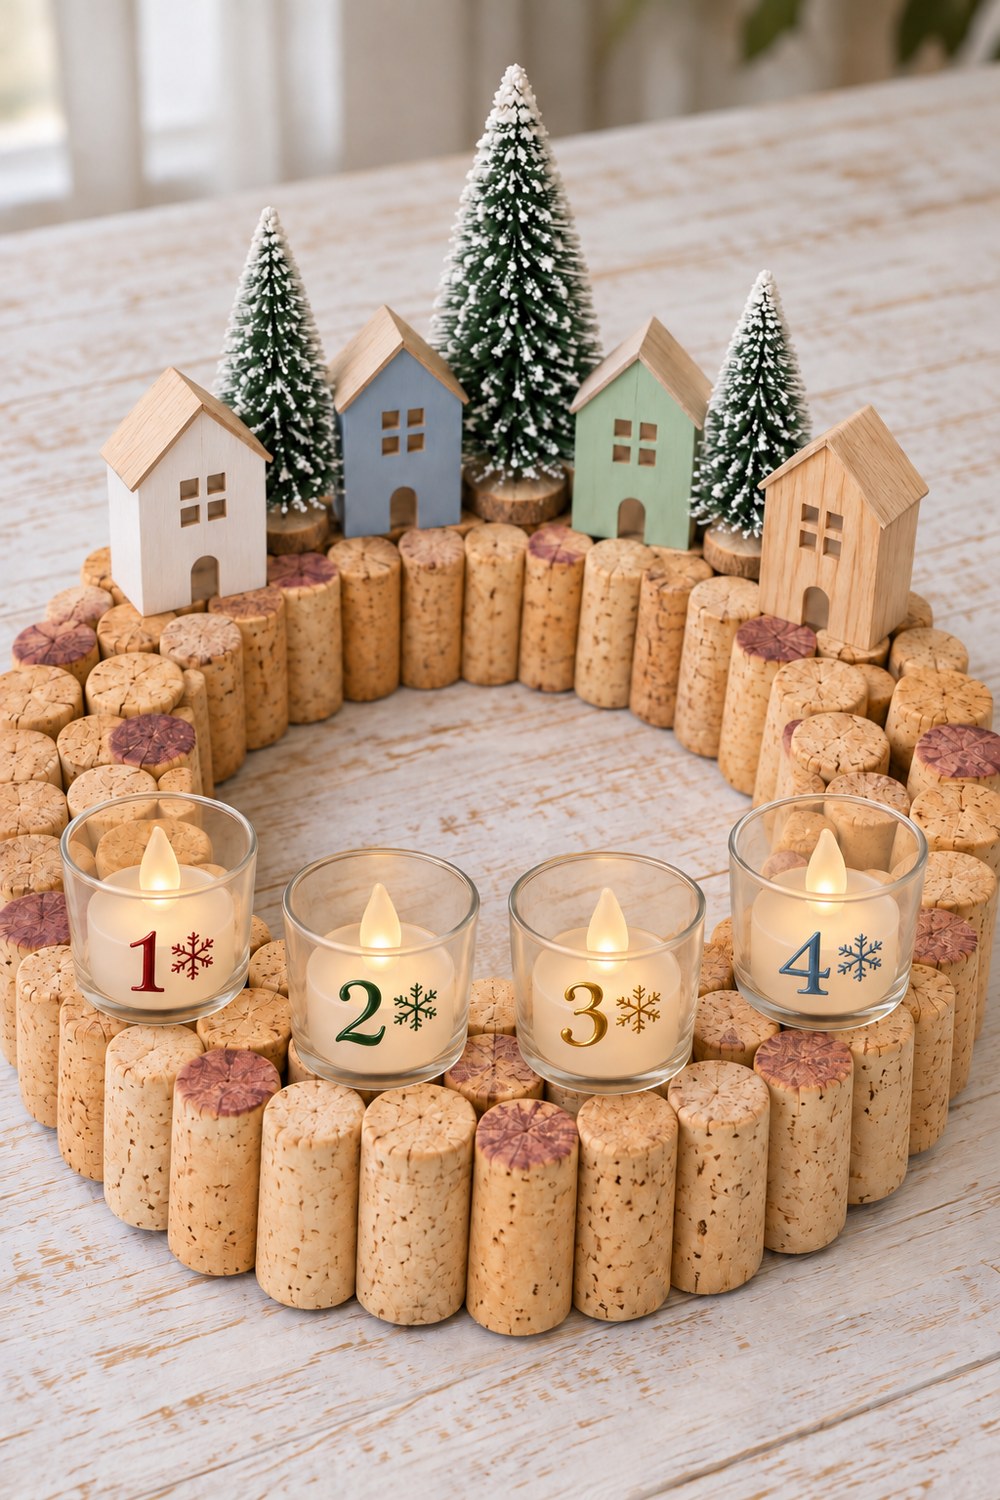
An Advent wreath has four candles, one lit on each of the four Sundays before Christmas, which explains the numbers on the cups. The custom goes back to Hamburg in 1839, when the pastor Johann Hinrich Wichern set candles on a cartwheel for the boys in his orphanage, who kept asking how long it was until Christmas. In 2026 the first Sunday of Advent falls on November 29.
This version is a ring of upright corks two or three rows deep, with wooden houses and bottle-brush trees standing on the corks at the back and four LED tealights in painted glass cups at the front.
You’ll need: about 90 natural corks, a ring of stiff cardboard 12 inches across and 3 inches wide, hot glue, four small wooden houses, three bottle-brush trees (one taller), three thin wood slices, four small glass cups, four LED tealights, and glass paint pens in red, green, gold and blue.
- Glue corks upright around the outer edge of the cardboard ring, with the wine-stained ends up wherever you have them. Fill in a second row inside the first, then a third. Two rows take about 70 corks, three about 90.
- Glue each bottle-brush tree to a wood slice. Glue the houses and the trees on top of the corks along the back half of the ring, with the tallest tree in the middle.
- Paint a number from 1 to 4 on each cup, each in its own color, and add a small six-armed snowflake beside it. Let the paint cure as the pen instructions say.
- Glue the cups on top of the corks along the front half of the ring, in order from left to right, with a ring of glue under each base. Drop an LED tealight into each cup.
10. DIY Cork Wreath with Oranges and Cinnamon
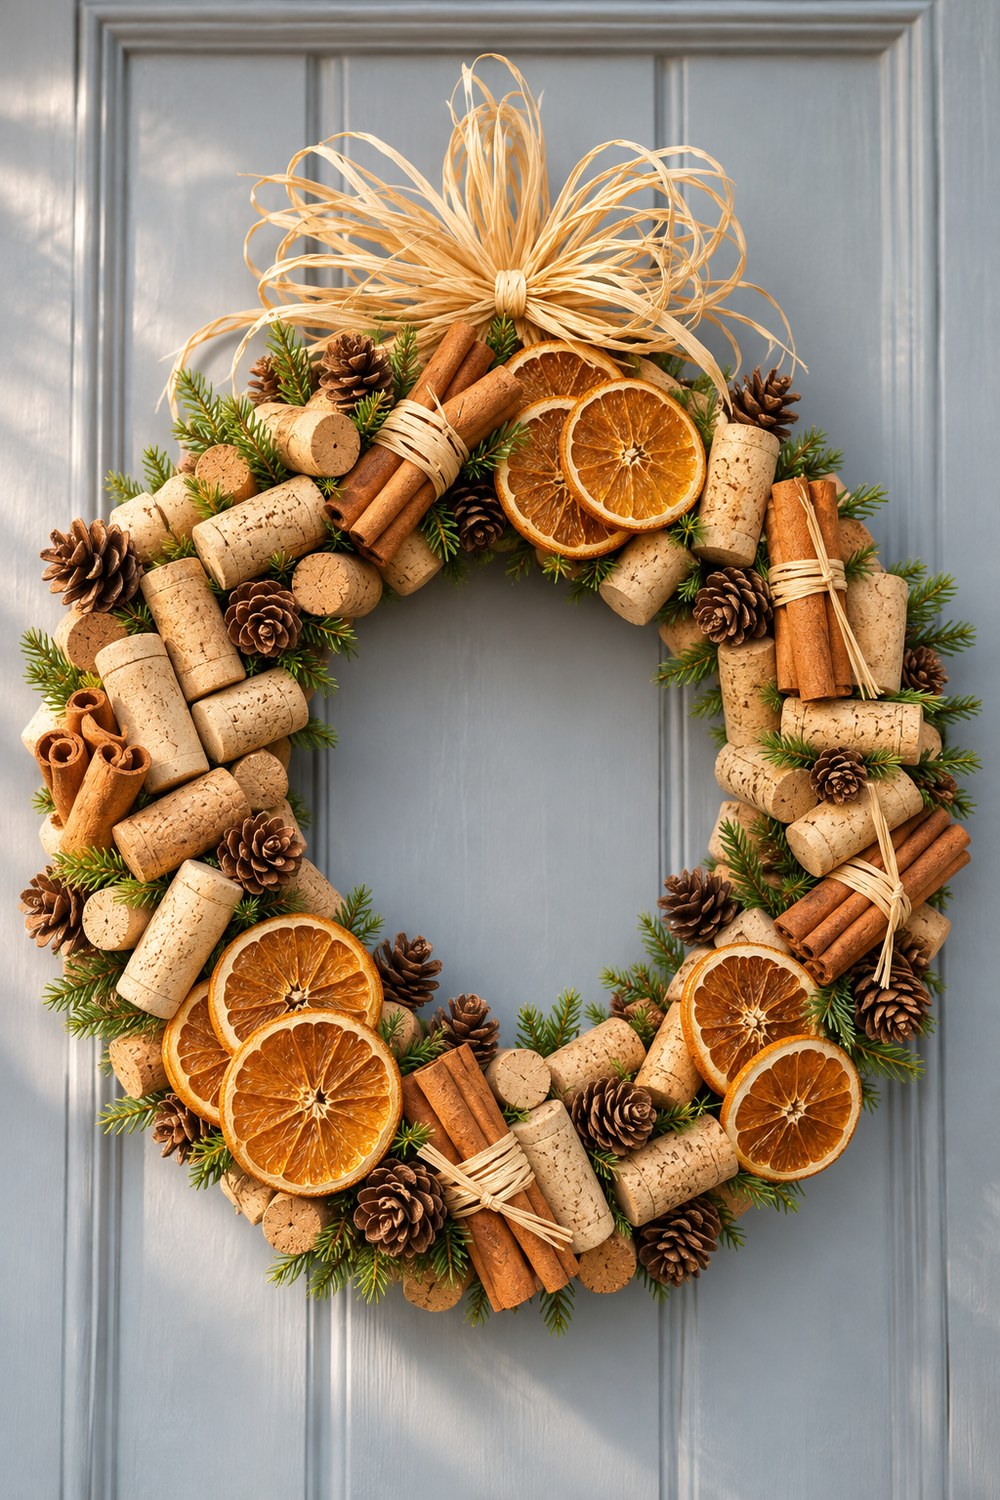
Corks piled on at every angle, dried orange slices, cinnamon tied with raffia and little pine cones give this DIY wine cork wreath the look and smell of Christmas baking. The loose, heaped look is the goal for a cork Christmas wreath like this, so don’t line anything up.
You’ll need: a straw wreath form about 12 inches across, a few dozen natural corks, 2 or 3 oranges, cinnamon sticks, natural raffia, small pine cones, sprigs of faux evergreen, hot glue and a wire loop for hanging.
- Slice the oranges about ¼ inch thick, pat them dry and bake them on a rack at 175 to 200°F (80 to 95°C) for 3 to 5 hours, turning them every hour, until they’re dry and stiff.
- Tie most of the cinnamon sticks into bundles of three or four with raffia, and keep a few loose.
- Glue corks over the front and sides of the form at different angles, leaving small gaps.
- Glue the orange slices, cinnamon and pine cones into the gaps, grouping the oranges in twos and threes, then tuck the greenery in last.
- Tie a big raffia bow at the top and fix the hanging loop behind it.
Wine Cork Crafts FAQ
Where can I get corks if I don’t have a big stash?
If you’re planning a lot of Christmas crafts with wine corks, ask a restaurant or wine bar to save theirs for you. Craft stores also sell bags of new corks, though those soften less when you steam or boil them for cutting.
Do I have to soften corks before cutting them?
Yes, boiling or steaming them first gives a clean cut instead of a crumbly one. Corks that stay whole, like the legs of the reindeer or the corks in the candle holder, go straight from the jar to the glue gun.
Can I use synthetic corks?
Yes, in any project that keeps the corks whole: the beaded drops, the painted trees, the cone tree, the candle holder and both wreaths. They’re slippery under a knife and need a small saw, so use natural cork for anything you cut.
What about champagne corks?
Save them for the heads. The wide top of a champagne cork gives the gingerbread man and the snowmen their round faces, so a couple of champagne cork ornaments are already hiding in this list.
Can kids help with these DIY cork Christmas crafts?
Yes, with the hot and sharp steps left to an adult. Children can paint cork ends, press rounds into glitter, thread beads and tie scarves, while an adult handles the boiling water, the knife and the glue gun.
Why LED candles?
In both candle projects the corks, glue and twine or little wooden houses sit right against the cups, and an LED tealight gives the glow without a flame.